By the end of this guide, you will be able to:
- Add a new insurance policy and keep its details up to date
- Find, review and export insurance records
- Allocate fleet vehicles to a policy and confirm compliance is aligned
- Record accident details and link claims to the correct accident
1. Add a new insurance policy
Start by capturing the policy itself before allocating vehicles to it.
From the main navigation menu, select Insurance. Click the Add Insurance button which will display the add insurance modal.
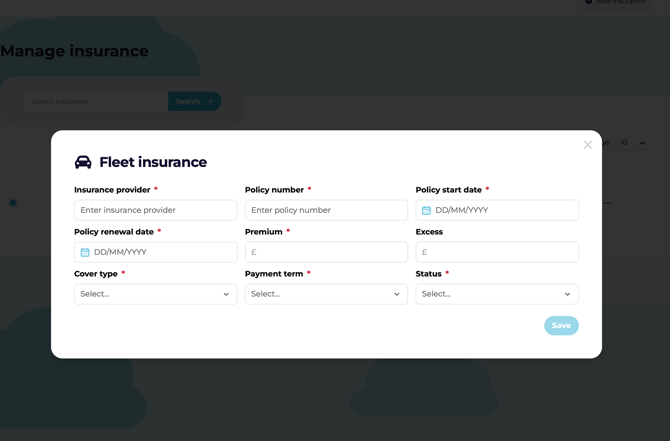
- Enter the required policy details:
- Insurance provider name
- Policy number
- Policy start date
- Policy renewal date
- Premium excess
- Cover type
- Payment term
- Insurance status
- Choose the correct status:
- Active
- Suspended
- Renewed
- Cancelled
- Save the policy so it appears in the insurance table.
Make sure policy dates — especially the renewal date — are entered correctly, as they drive vehicle compliance tracking.
2. Find, review and export insurance records
Use the insurance table to locate policies, browse records, or pull a copy for reporting.
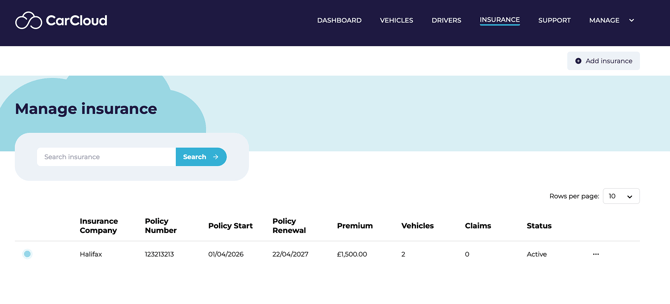
- Use the search function on the Insurance page to locate a specific policy.
- Adjust the rows per page setting if you need to view more records at once.
- Export the insurance table to CSV when you need a downloadable copy for reporting or review.
- Select an insurance record from the table to open its details.
3. Edit an existing insurance policy
Keep policy information current as cover, dates or status change.
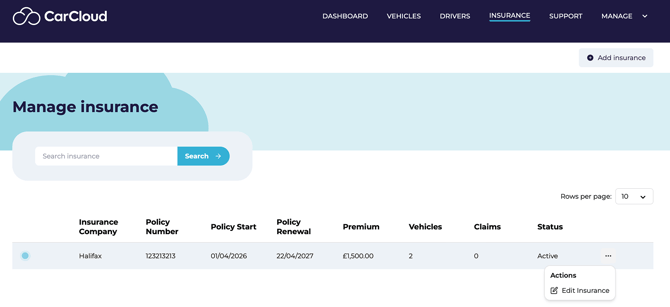
- Open the Actions menu for the policy you want to update (click on the three dots at the end).
- Select the option to edit the record.
- Update the policy name or any policy details as needed.
- Save your changes.
4. Review policy details and allocate vehicles
Once a policy is saved, open it by clicking on the insurance name to confirm its details and link vehicles to it.
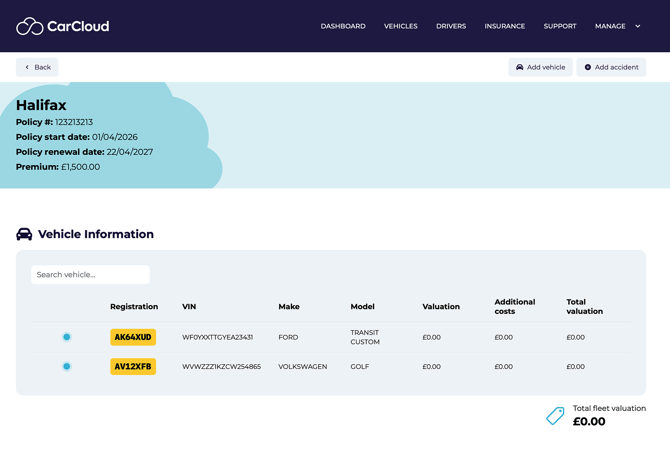
- Review the policy data screen and confirm the displayed details:
- Policy number
- Policy start date
- Policy renewal date
- Premium
- Review the Vehicle Information table to see which vehicles are already linked to the policy.
- Click Add Vehicle to assign a new vehicle to the policy.
5. Add eligible fleet vehicles to the policy
Allocate the vehicles that are covered under this policy.
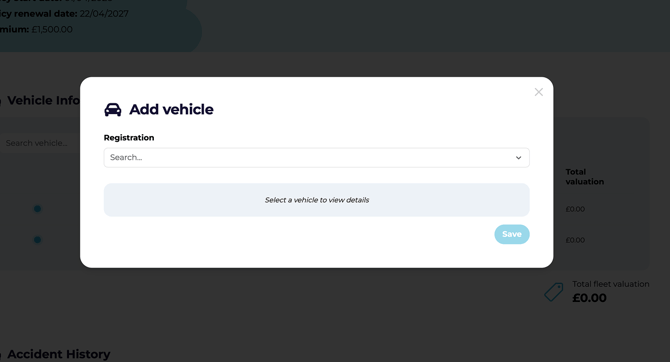
- In the registration dropdown, either:
- Select a vehicle from the list, or
- Search for a vehicle by registration.
- Click Save to add the vehicle to the Vehicle Information table.
- Verify that the vehicle appears in the table after saving.
6. Confirm insurance compliance updates
After vehicles are allocated, compliance updates are automatically made by CarCloud.
- Confirm that the insurance compliance checks have refreshed for each allocated vehicle.
- Verify that the vehicle's insurance renewal date matches the renewal date of the linked policy.
- Use this check to make sure your fleet records remain aligned with the active policy.
7. Record accident insurance details
Capture accident records as soon as possible after the incident to keep details accurate and complete.
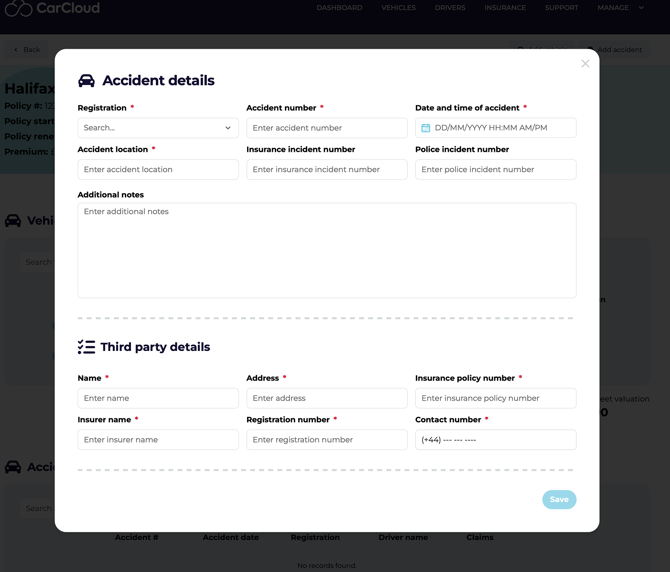
- In the insurance section, click Add Accident.
- Enter the accident details:
- Vehicle registration
- Accident number
- Date and time of accident
- Accident location
- Incident details, if applicable
- Insurance incident number
- Police incident number
- Additional notes
- Add any relevant third-party details.
- Save the accident record once all required information has been entered.
Best practice: Enter accident details as soon as possible after the incident — fresh information is far easier to capture accurately than reconstructing it later.
8. Add a claim to an existing accident record
Link claims to the accident they relate to, and keep them updated as the case progresses.
- Open the accident record in the system.
- Add the claim information linked to that accident.
- Ensure the claim is associated with the correct accident record before saving.
- Keep the claim details updated as the case progresses.
Things to watch for
- Enter policy dates carefully — especially the renewal date — because they drive compliance tracking.
- Double-check accident and claim details before saving to avoid incomplete or inaccurate records.
- Use the correct insurance status so reporting and compliance checks remain accurate.
Tips for efficiency
- Use the search function to find policies or vehicles quickly instead of scrolling through tables.
- Export to CSV when you need to review multiple policies offline or share data with others.
- Keep policy and vehicle records updated immediately after changes to reduce compliance issues.
- Enter accident details as soon as possible after the incident to improve record accuracy and completeness.
What's next?
- Head back to Your Driver Dashboard if you also drive a fleet vehicle and need to check your own compliance.