By the end of this section, you'll be able to:
- Start a finance report for a vehicle purchased with a loan
- Enter the loan details accurately so the tracker reflects reality
- Review the loan tracker, vehicle valuation, and estimated equity
- Understand the repayment and interest figures the platform calculates
- Record actual settlement figures and build up a settlement history
These are essential for many vehicle decisions, including managing insurance, cash flow and next car options.
Step 1: Open the vehicle record and find the finance section

- Select the relevant vehicle record on the Vehicles page.
- Go to the Vehicle Data page by clicking on the relevant registration number.
- Scroll down to the Financial Overview section.
- Confirm you're working on the correct vehicle before generating the report.
Step 2: Start the report and enter the initial finance details
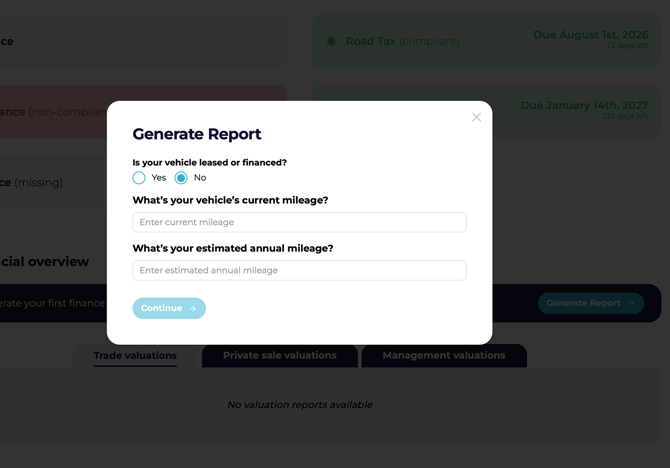
- Click Generate Report.
- In the pop-up, select No as the vehicle is not leased and it does not have a finance agreement.
- Enter the vehicle's current cumulative mileage.
- Enter the estimated annual mileage.
- Click Continue to let the platform identify the agreement type.
Step 3: Confirm the vehicle was purchased with a loan
- Click Continue.
- When prompted Did you buy your car with a loan?, select Yes.
- The report will move into the loan-specific input section.
Step 4: Enter the loan details
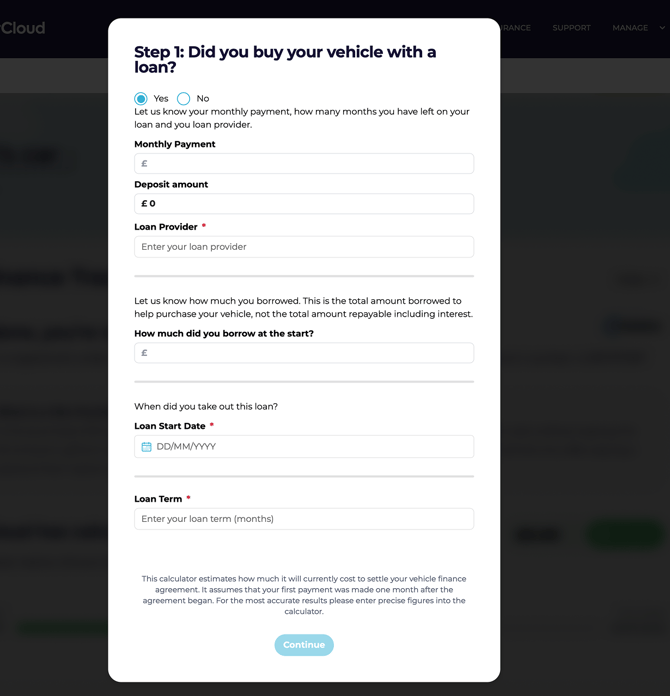
- Enter the monthly payment amount.
- If there was no deposit, enter the loan provider name.
- Enter the rest of the loan information:
- How much was borrowed at the start
- Loan start date
- Loan term (in months, from the start to the end, often full years eg 24 months, 36 months etc)
- Review every entry for accuracy before continuing.
⚠️ Double-check all loan values before continuing — incorrect entries will affect both the tracker and the settlement calculations down the line.
💡 Gather your loan documents before you start. Having dates, amounts, and the provider name to hand means you won't have to stop midway to dig them out.
Step 5: Generate the loan tracker
- Once every loan detail is entered, click Continue.
- The platform will generate the loan tracker for the agreement.
- Confirm the report loads successfully before reviewing the results.
Step 6: Review the loan tracker and valuation details
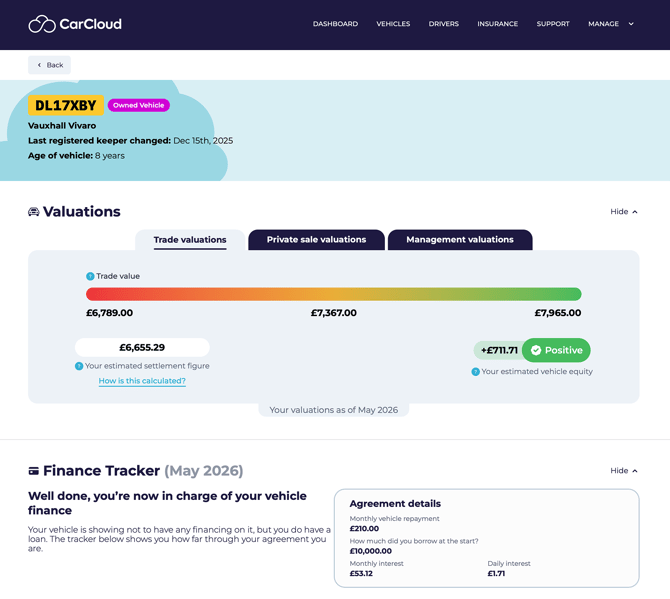
- Check the loan tracker for the agreement details.
- Review the vehicle valuation and estimated equity.
- Verify the agreement information is displaying correctly.
💡 If any of the figures look off, head back through Steps 1–3 and check your inputs — the tracker is only as accurate as the data behind it.
Step 7: Review repayment and interest information
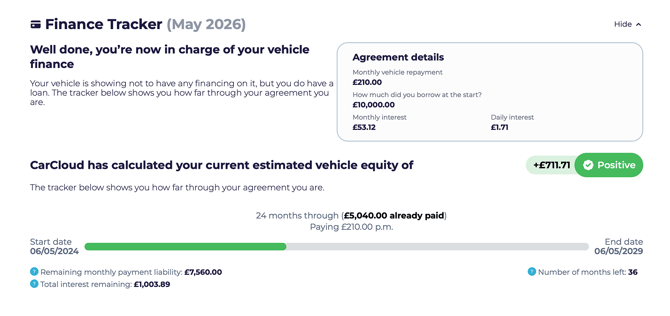
Review the following financial details in the report:
- Monthly vehicle repayment
- Amount borrowed at the start
- Monthly interest
- Daily interest
Use these figures to understand the current loan position at a glance.
Step 8: Review settlement figures and history
Savings opportunity! At points during the loan, it will be possible to settle the loan early by paying 58 days interest (or as specified in the agreement) and saving on the full interest amounts that would otherwise have been paid over the full loan duration. This is often only possible once at least 50% of the loan has been repaid.

The platform initially provides an Estimated Settlement figure based on your loan tracker.
- Locate the Settlement Figure section positioned under the Finance Tracker section in the Finance Report.
- Review how the estimated settlement figure was calculated.
- Confirm whether the agreement is longer than 12 months — if it is, the 58-day interest charge may be included.
- Check the early settlement saving displayed alongside the settlement figure.
Step 9: Enter an actual settlement figure when you have one
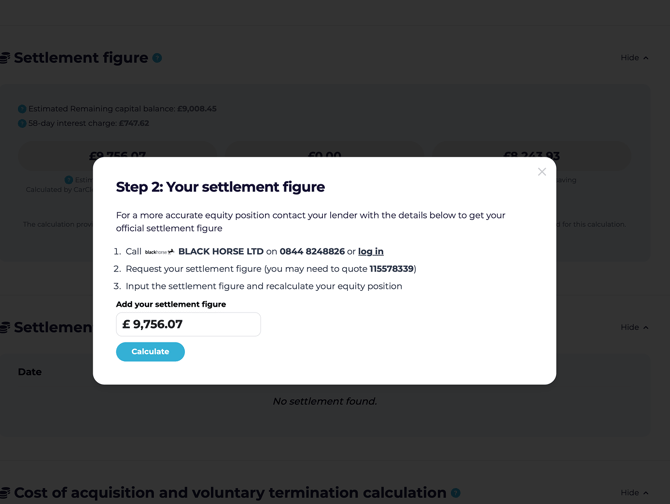
- If you have the actual settlement figure from your agreement documentation, click Enter Actual Settlement Figure.
- Enter the value in the pop-up.
- Click Calculate.
- Confirm the estimated settlement figure greys out and the actual settlement figure becomes the active value.
⚠️ Only enter an actual settlement figure once you've verified it with the lender. Settlement values change monthly, so always use the most current information available.
Tips for keeping loan reports accurate
- Gather all loan documents before starting so you don't have to stop midway to track down dates or amounts.
- Use the exact figures from your loan agreement to reduce errors in repayment and settlement calculations.
- Review the generated tracker immediately after submission so you can catch any missing or incorrect data early.
- Build up the settlement figure history over time — it's a useful reference for future comparisons and renewal conversations.
What's next?
- Head to Lease and Contract Hire Finance Reports if you also manage leased vehicles.
- Visit the Vehicles Management page to review the wider vehicle record.